
Despite giving it a shot, owning a lot of the proper equipment, studying it off and on for several years and even doing it professionally, I’m still hesitant to refer to myself as a photographer. For me, the title comes with assumptions: A photographer has an extensive portfolio because they’ve been doing it a long time. A photographer sometimes has loads of equipment and even if they don’t they still know to use it. All of it. A photographer lacks the ability to use any form of auto mode on their camera of choice. Ultimately a photographer knows what they’re doing.
In a nut shell: Having a DSLR and a Facebook page does not a photographer make.
Amateur is a generous term to describe my photography skill level. I’m learning, though, and with learning comes the desire to take on new projects and new levels of study. A while back I found this post online about how to build your own portrait photography backdrop stand on the cheap. Thinking it was something I’d like to do, I bookmarked it…
…and bookmarked it stayed. Like a lot of other projects I intend to take on, this one also took a back seat.
Until today.
It’s been a wild couple of weeks at the office and I was in need of something to get my mind off of stuff at home. I’ve been wanting to get in the garage and work on some hands-on projects for a while and what better place to start than working on this cheap, simple DIY project that I can use to further my knowledge of the art of photography? I read through the post mentioned above and decided that I was going to use this plan but modify it slightly, of course, because the author was taking photos of children, mostly, and kids just aren’t allowed at my house. Here are the plans I had laid out:


If you notice in my plans I was assuming I would be buying 10′ PVC pipe so I broke down what cuts I would need the store to make for me so I could get them home easiest. After a quick run this morning I went to Lowe’s and found that they had 10′ PVC but also 5′ PVC which was the maximum length I needed anyway so I modified my calculations and picked up the following items:
- (10) 5′ pieces of 1″, schedule 40 PVC pipe (My drawings called for 40′ total but I got 50′, or 10 pieces, thinking if I screwed a piece of it up I would be okay. Ultimately I ended up with 3 pieces of pipe leftover so the total amount actually used was 7 pieces, or 35′ total.)
- (2) 90 degree connectors* I usually call “Ls” but some people call them “Elbows.”
- (8) end caps*
- (8) T connectors*
*Since I used 1″ PVC pipe I was sure to choose 1″ connectors. It’s very important to pay attention to this detail unless you just want to go back to Lowe’s later. I didn’t want to go back. SMART.
Also, there’s a few things you may need to pick up if you don’t already have them at home. I also used (but already had):
- A hack saw**
- A vice or some grips for steadying your pipe while you cut.
- A sturdy workbench, or what I used, a set of saw horses.
**My hack saw is a baby-sized saw. I mean it’s tiny. I was able to make all of my cuts but ended up warping my blade by the time I was finished. So, you CAN do it with a small hacksaw but I’d recommend a bigger, better quality one. I also occasionally used the Dremel to even up some cuts that I didn’t make as cleanly as I would’ve liked.
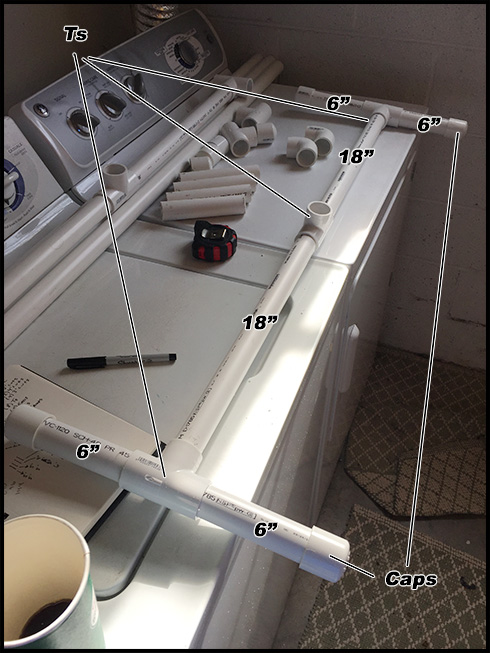
Once I gathered all of my equipment and had my garage set up I made a list of the pipe lengths I would end up needing:
- (2) 5′ pieces
- (2) 4′ pieces
- (2) 3′ pieces
- (4) 18″ pieces
- (8) 6″ pieces
My two 5′ pieces were simple since that’s how long these cuts were anyway, though I did cut off about a half-inch of one because it had been cut too long to begin with. I then took another 5′ piece and measured 4′ of it, marked it and cut. I did this twice, reserving the two remaining 12″ pieces to turn into four 6″ pieces.
Next I took the next two 5′ pieces, measured 3′ and cut both, leaving 2′ remaining on each. Of these pieces I measured 18″ and made cuts, taking care of two of my 18″ pieces and two more 6″ pieces.
Finally, I used one more 5′ piece, measured & marked the 18″ mark, the 3′ mark, the 3’6″ mark and finally the 4′ mark, making cuts at each. This yielded the final two 18″ pieces, the final two 6″ pieces and 12″ left over.

Now it’s time to assemble. This part is easy. I began by building my “feet” by using two 18″ pieces, four 6″ pieces, four end caps and three T connectors for each foot. You can see how this went together below:
Repeat for the second foot and:

Finally I brought the two feet together by moving vertically with 4′ pieces going into the T connectors that form the mid-point of each foot. A T connector on the other side of each 4′ piece is connected by a 5′ piece across the middle. Continuing the ascent, the 3′ pieces go in the remaining T connector slot and are both topped with the two L connectors, which then come together with the final piece: the remaining 5′ pipe.
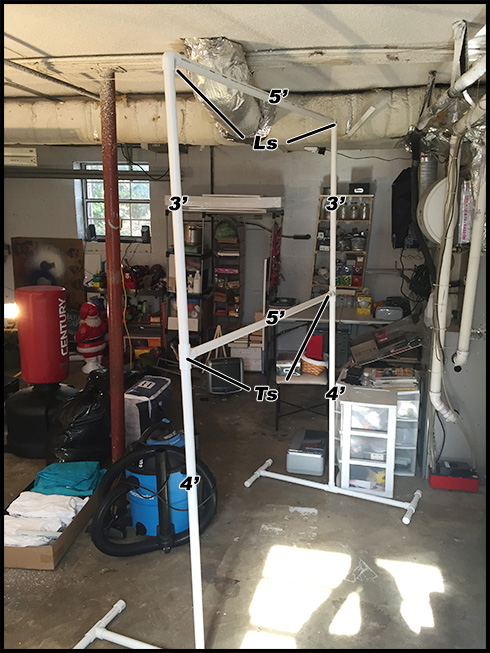
Not too shabby, I have to say. This seems sturdy enough to handle a session but is quickly disassembled and stored if need be. Depending on your backdrop of choice you may want to invest in some nice strong clamps to hold the curtain, fabric or whatever in place while you worry about taking pictures of pretty people. Seeking a quick back drop I chose to go with the ugly blue tarp that was folded up in the corner of the basement to use as a test and it worked great.
http://instagram.com/p/yiYOwOr2RC
I’m not looking to carry this massive thing with me place but anything is possible. As it is right now, I’m going to be doing portraits of my in-house models and probably anyone that visits. That threat alone is enough to keep us from having to entertain anytime soon, I’m sure of it!
If you decide to build one of your own please feel free to use my awful drawings and instructions but I take zero credit for the building blocks I used to make this happen. Please visit Dandelions On the Wall if you want to show some love for the project!
